- handbook
- Company
- Company
- Operations
- Product
- Development & Design Practices
- Design
- Development
- contributing
- Front End
- How We Work
- Markdown How-To
- packaging
- release
- Releases
- security
- staging
- Using Git
- Website A/B Testing
- Internal Operations
- Legal
- People Ops
- Sales & Marketing
- Marketing
- blog
- Boiler Plate Descriptions
- Content Channels
- Content Types
- HubSpot
- Marketing
- Video
- Webinars
- website
- sales
# Blog
# Blogging Process
Content creation and blogging are an effective way to communicate with our community. The process for publishing a blog is as follows:
- Raise an issue for the content in our private Github repository.
- If the content is date specific create an 'all day' event on the Google Calendar FlowForge Publishing Schedule, include a link to the issue in the event description. If you don't have the permission to create events please ask our Google Workspace admin to give you access.
- If you want to work on the content immediately please triage the issue into our development board.
- Create the draft blog post in a Google Doc. The document should be stored in the Marketing -> Content folder. Everyone at FlowForge should be given access to comment on the document. Add a link to the document in the GitHub issue.
- Ask people to review the document draft by sharing it directly with them using the Share button in the document. This will send your reviewers an email notification.
- As a document reviewer, you should leave red-line edits in the document or add comments to the document.
- Once the document is finished, create a new branch of the website repository and then follow our standard development processes. Google Docs has an extension to convert the document to markdown.
- It is OK for you to merge your own PR to main without review where the content is urgent or has been reviewed outside of Git but where it is practical to follow the standard process we encourage you to do so.
# Blog CMS
When creating a blog post there are several headers which are used by the CMS to populate the blog article as well as the blog index page. The headers are as follows:
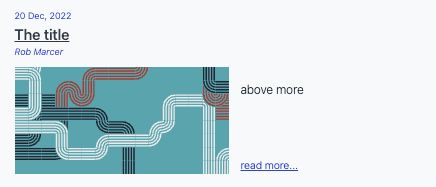
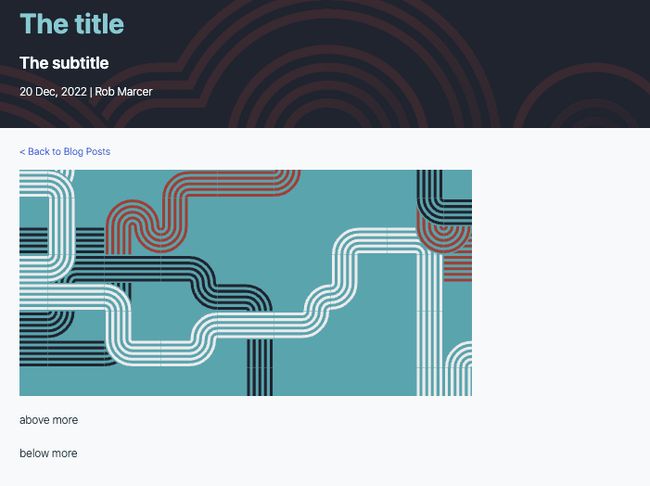
# Title
The title of the page can be seen on both the blog index and the articles.
# Subtitle
The subtitle is only shown on the articles.
# Description
The description is unused currently
# Date
The data can be seen on both the blog index and the articles.
# Authors
The author can be seen on both the blog index and the articles.
# More tag
The '<!--more-->' tag is used to define the text shown in the blog index from each article.
# Example header content
---
title: The title
subtitle: The subtitle
description: The description
date: 2022-12-20
authors: ["rob-marcer"]
---

above more
<!--more-->
below more
# Example blog index item based on the header above
# Example blog article based on the header above
On this page
Page maintainer
Head of Marketing
Updated: Wed Mar 22 2023 08:17:51 GMT+0000 (Coordinated Universal Time)